
Hello everyone!
Well, we finally did it! I have long admired the look of planked or ship lapped walls for bringing that farmhouse look into a home ever since I first saw the show, Fixer Upper. But, once I saw it in person at a friends house, I knew I really wanted to do it in mine. I discovered, a little goes a long way. So, my husband and I decided to do an accent wall in our front sitting room. It's a plain wall with not much furniture on it and could use a little interest.
So, if you're interested in the tutorial with lots of pics, then continue reading!
First, my husband measured the wall and then went to a hardware store for sheets of plywood. He got enough to cover the wall. The store would've been able to cut the plywood into planks, but their saw was not measuring accurately (so they said). So, we had to bring it home and do it ourselves. But, I highly recommend having someone else do this part if you can!!!

Here are all of the planks stacked in our house.

First, find the studs in your wall with a stud finder. Mark the wall accordingly.

Then begin with your first plank. Use a level to make sure it's straight. That is most important!

Use a nail gun to nail it to the wall using your stud marks as a guide.

Cut the wood planks as needed to fit the width of your wall. You will need a miter saw for that.

Then continue to add the wood down the wall. We used two pennies pressed together to measure the width we wanted between the horizontal planks. The width you choose is your personal preference. Some people use nickels.


Eventually, you will probably run into an outlet or light switch.

For that, just measure your outlet opening and transfer those measurements to the plank of wood that will cover it. Use a jigsaw to cut out that opening.


Then, place that plank around the outlet as shown.

Now, here is a look at the completed plank wall in its unpainted state.

We chose to remove our baseboard and run the planks down to the floor because we needed to replace our baseboards with larger ones anyway. So, we will be adding a new baseboard to this wall.
Next, we filled in the nail holes with wood filler and primed the boards.
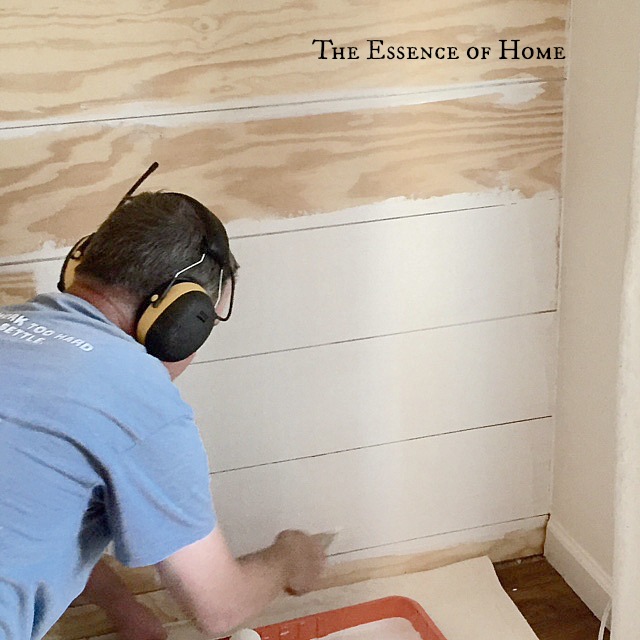
And finally, the last step is painting it in the color of your choice. We used the same wall color that we had before, Linen White from Benjamin Moore.
I will share the finished wall this week! Stay tuned!
Thanks for stopping by.
~ Kelly ~
I will share the finished wall this week! Stay tuned!
Thanks for stopping by.
~ Kelly ~
26 comments:
That's lovely Kelly! Great step by step instructions.
Can't wait to see the reveal!
How exciting!!! It's going to be beautiful Kelly!
How exciting!!! It's going to be beautiful Kelly!
The wall is fantastic. You make it look so easy that I think I can do it! I can't wait for the next installment.
This brought back memories. When we bought the cabin we added planks (but they were tongue and groove) to walls AND ceilings. The hardest part was the outlets. Trying to get the measurements just right proved to be somewhat challenging for us but t looks like it was easy for your hubby!
I didn't realize this was done using plywood, making it an affordable project. Of course, with a log cabin I won't be doing it anytime soon, but I'm excited for you that you 'checked off' this project for your lovely home.
Wow....looking really great Kelly!....Cannot wait to see the final reveal!
Wow this is wonderful- I bet you just love it! Your hubby did a perfect job on it. I hadn't imagined that you could create the look with plywood- great option!
It looks amazing! Can't wait to see it finished. Your sister did plank wall post with a surprise today! Fun that you both did planked wall posts!
Love this so much Kelly! It turned out just beautiful!!
Kelly this looks fantastic. Can't wait to see it complete.
Cindy
That's quite a project and I just know that there are people out there who will be showing each step to their husband/handymen!
Too funny that you and your sister both have "planked" walls on the blogs today! Looks great. Here there are places you can buy the "planks"/
It looks like sooo much work, but the results are CERTAINLY worth it. It looks great and it adds so much charm. I can't wait to see your entirely finished room.
Best & Bisous,
Michelle from Simply Santa Barbara
I would have given up when the store told you they couldn't do the cuts. Love your persistence! It's going to look great.
Looks fantastic! I will tell you that we had them cut our wood at Home Depot. The guy running the saw got a phone call midway through the project and they switched people. And so... we have some boards that are about 1/8" off and I can see it!!
Be glad you cut your own. :)
This looks so great Kelly. I cannot wait to see it finished. I just saw Kim's post on the removable shiplap too.
Love the look of planked walls. Awesome job.
Kris
Kelly,
I never knew that Home Depot would cut wood for customers until I read it on a blog. It's a good thing the HD employee knew there was a problem with the saw. Better to cut your own than to have poor cuts. You wall is looking wonderful. It is amazing what special treatment on just one wall can do for a room.
Judith
It's looking great and I can't wait to see the final product! Shiplap adds so much character to a room, but still keeps it neutral. I love that!
So nice to have a handy husband..Looks great already.
So exciting to see how it's done. Will be watching as it gets finished up.
I am loving it! Can't imagine the work!
Kelly, I am impressed you and your husband are doing this.Can't wait to see all done. You always accomplish anything you set your mind to do.
The wall turned out lovely. Thanks for the tutorial ♥
summerdaisy.net
I bet that looks amazing. I've tried to figure out which wall to plank. I can't wait for the reveal.
Katie
Fun project, Kelly! Looking forward to seeing it!
Oh my...I just know it will look awesome!! Can't wait to see it all finished.
~Cindy
Post a Comment